�DEFOGGER -REAR WINDOW
�1993 Nissan Sentra
1993 ACCESSORIES/SAFETY EQUIPMENT Nissan Rear Window Defoggers
Altima, Maxima, NX, Pathfinder, Pickup, Quest, Sentra, 240SX, 300ZX
DESCRIPTION & OPERATION
All models use a rear defogger relay, switch and rear window heater grid. Pathfinder also uses a rear defogger timer to limit heater grid on time. Pickups do not use any other devices. All other models use a time control unit to limit heater grid on time.
Rear Defogger Relay
Relay supplies battery voltage to grid filament. See REAR DEFOGGER RELAY LOCATION table.
REAR DEFOGGER RELAY LOCATION TABLE
���������������������������������������������������������������������������������������������������������������������������������
| Application | Location | |
| Altima, Maxima, NX & Sentra .......... | Behind Left End Of Dash, | |
| On Right Side Of Fuse Block | ||
Pathfinder ........................ Behind Opening In Left Rear
Interior Quarter Panel Pickup ...................... Right Front Of Engine Compartment 240SX ................................. Under Left End Of Dash,
To Right Of Junction Block 300ZX & Quest ........... Under Left End Of Dash, In Fuse Block
���������������������������������������������������������������������������������������������������������������������������������
Rear Defogger Timer (Pathfinder)
Unless control switch is turned off first, rear defogger timer will turn off defogger after about 15 minutes. Timer is located behind opening in left rear interior quarter panel.
Time Control Unit (Except Pathfinder & Pickup)
Unless control switch is turned off first, time control unit will turn off defogger after about 15 minutes. Time control unit, which also controls wiper delay, warning chimes, etc., is located near brake pedal bracket (Altima, Maxima, NX and Sentra) or behind left kick panel (Quest, 240SX and 300ZX).
TESTING
SYSTEM TESTING
1) Start engine. Turn rear defogger control switch on. Glass should feel warm after a few minutes. If glass is not warm, use a test light or voltmeter to check for battery voltage at grid feed wire. If battery voltage is present, perform GRID FILAMENT TEST.
2) If battery voltage is NOT present, check fuse, wiring harness and control switch. If these components are okay, check rear defogger relay. Check rear defogger timer (Pathfinder) or time control unit (except Pathfinder and Pickup).
GRID FILAMENT TEST
1) To locate breaks in grid wire filaments, ensure battery voltage is present on feed side of grid. Connect voltmeter between middle portion of grid and vertical section of grid (at either end of window).
2) Probe entire length of grid. If voltmeter needle moves abruptly, check for break in grid at that point.
ON-VEHICLE SERVICE
GRID FILAMENT REPAIR
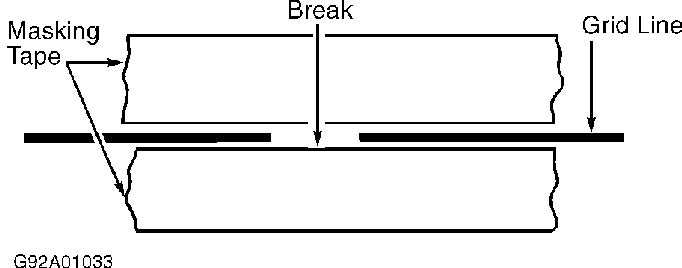
1) Clean broken grid and its surrounding area with a cloth dampened in alcohol. Apply masking tape to both sides of grid line. See Fig. 1.
2) Apply a small amount of silver conductive paint to tip of a drawing pen. Apply silver conductive paint on grid, overlapping existing grid approximately .20" (5 mm).
3) After 10 minutes, check repaired grid for continuity. DO NOT touch repaired area while test is being performed. If repaired area is okay, use a heat gun and apply hot air to repaired area for approximately 20 minutes. If a heat gun is not available, allow repaired area to dry for 24 hours.

Fig. 1: Repairing Rear Defogger Grid Element
WIRING DIAGRAMS
Proceed to appropriate WIRING DIAGRAMS article listed below in WIRING DIAGRAMS section.
- *
- WIRING DIAGRAMS (for 240SX).
- *
- WIRING DIAGRAMS (for 300ZX).
- *
- WIRING DIAGRAMS (for Altima).
- *
- WIRING DIAGRAMS (for Maxima).
- *
- WIRING DIAGRAMS (for NX).
- *
- WIRING DIAGRAMS (for Pathfinder).
- *
- WIRING DIAGRAMS (for Pickup).
- *
- WIRING DIAGRAMS (for Quest).
- *
- WIRING DIAGRAMS (for Sentra).